


Creating and Using POJO Classes in RestAssured for API Testing
Introduction
POJO stands for Plain Old Java Object. POJO is just like a regular object of Java. The task of POJO is to increase the reusability of the code. It is also used to improve the readability of the code.
POJO Class Applications:
Serialization/Deserialization: Complex data (such as JSON or XML) can be transformed into Java objects and vice versa using POJOs. This is very helpful for testing APIs, like RestAssured. The ObjectMapper class belongs to the Jackson data-bind package. It provides functionality for reading and writing JSON, either to and from basic POJOs (Plain Old Java Objects). We always use the ObjectMapper class to convert Java objects into JSON.
Data Storage: POJOs are frequently used as containers to store information that may be transferred across application layers, such as between a web application’s server and client or between the database and business logic.
How to create POJO of Parent and Child Node
Parent Node: There are five parent nodes
- name
- age
- salary
- IsMarried
- Address
Child Node: The Address is a child node.
					{
  "name": "Tom",
  "age": 32,
  "salary": 50000,
  "IsMarried": true,
  "Address": {
    "zip": 201005,
       "state": "Uttar Pradesh",
       "city": "Ghaziabad"

  }
}
Steps to create the POJO class
1.We will create three classes in one package first class name
EmployeeAddressPojo, the second class name CreateEmployeemain, and the third class name CreateEmployee2Pojo.
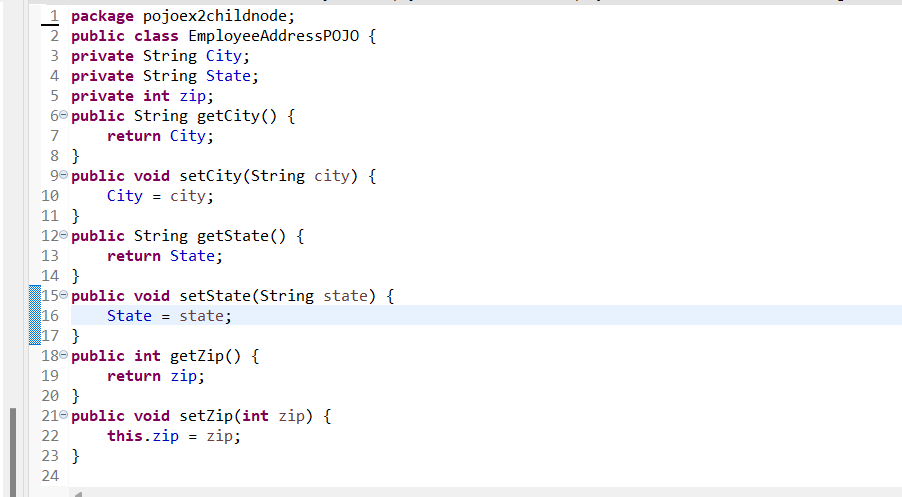
2. EmployeeAddressPojo
We have declared three fields in the Address class we will create three private members for each field and create a POJO class by using getter and setter methods.
Code Snippet:
					public class EmployeeAddressPOJO {
private String City;
private String State;
private int zip;
public String getCity() {
	return City;
}
public void setCity(String city) {
	City = city;
}
public String getState() {
	return State;
}
public void setState(String state) {
	State = state;
}
public int getZip() {
	return zip;
}
public void setZip(int zip) {
	this.zip = zip;
}
Screenshot:
3.CreateEmployee2Pojo
We have declared five fields in the CreateEmployee2Pojo we will create four private members for each field and we will take the EmployeeAddressPojo class as a datatype and create a POJO class by using getter and setter methods.
Code Snippet:
					public class CreateEmployee2Pojo {
	private String name;
	private int age;
	private float salary;
	private boolean isMarried;
	private EmployeeAddressPOJO empAddress;//datatype is classname
	public String getName() {
		return name;
	}
	public void setName(String name) {
		this.name = name;
	}
	public int getAge() {
		return age;
	}
	public void setAge(int age) {
		this.age = age;
	}
	public float getSalary() {
		return salary;
	}
	public void setSalary(float salary) {
		this.salary = salary;
	}
	public boolean isMarried() {
		return isMarried;
	}
	public void setMarried(boolean isMarried) {
		this.isMarried = isMarried;
	}
	public EmployeeAddressPOJO getEmpAddress() {
		return empAddress;
	}
	public void setEmpAddress(EmployeeAddressPOJO empAddress) {
		this.empAddress = empAddress;
	}
Screenshot:

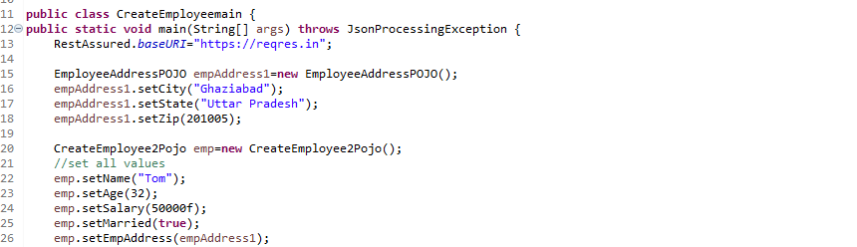
4.CreateEmployeemainWe will create an object of EmployeeAddressPojo and set values accordingly in a similar way we will create an object of CreateEmployee2Pojo and set values accordingly while setting Empaddress value we will add a reference variable of an object created by EmployeeAddressPojo.
emp.setEmpAddress(empAddress1);//added reference variable of EmployeeAddressPojo .
Code Snippet:
					public class CreateEmployeemain {
public static void main(String[] args) throws JsonProcessingException {
	RestAssured.baseURI="https://reqres.in";

	EmployeeAddressPOJO empAddress1=new EmployeeAddressPOJO();
	empAddress1.setCity("Ghaziabad");
	empAddress1.setState("Uttar Pradesh");
	empAddress1.setZip(201005);

	CreateEmployee2Pojo emp=new CreateEmployee2Pojo();
	//set all values
	emp.setName("Tom");
	emp.setAge(32);
	emp.setSalary(50000f);
	emp.setMarried(true);
	emp.setEmpAddress(empAddress1);//added reference variable of EmployeeAddressPojo .
Screenshot:
We have to serialize the value for that we need to create a JSON String with the help of the class ObjectMapper. The ObjectMapper class belongs to the Jackson data-bind package. It provides functionality for reading and writing JSON, either to and from basic POJOs (Plain Old Java Objects). We always use the ObjectMapper class to convert Java objects into JSON. We have to add Jackson Databinding dependencies. Now we will pass Java Object int ObjectMapper method.We have now created a JSON String we pass ‘empJson’ in the body.
Code Snippet:
					public class CreateEmployeemain {
public static void main(String[] args) throws JsonProcessingException {
	RestAssured.baseURI="https://reqres.in";

	EmployeeAddressPOJO empAddress1=new EmployeeAddressPOJO();
	empAddress1.setCity("Ghaziabad");
	empAddress1.setState("Uttar Pradesh");
	empAddress1.setZip(201005);

	CreateEmployee2Pojo emp=new CreateEmployee2Pojo();
	//set all values
	emp.setName("Tom");
	emp.setAge(32);
	emp.setSalary(50000f);
	emp.setMarried(true);
	emp.setEmpAddress(empAddress1);

	ObjectMapper obj=new ObjectMapper();
String empJson=	obj.writerWithDefaultPrettyPrinter().writeValueAsString(emp);

String response=	given().log().all().headers("Content-Type" ,"application/json").body(empJson)
	.when().post("api/users")
	.then().log().all().extract().response().asString();
System.out.println(response);


Output:
{
   "name": "Tom",
   "age": 32,
   "salary": 50000,
   "empAddress": {
       "zip": 201005,
       "state": "Uttar Pradesh",
       "city": "Ghaziabad"
   },
   "married": true,
   "id": "765",
   "createdAt": "2025-02-06T05:03:56.555Z"
Now we can deserialize the deserialization of POJO and convert a JSON or XML response into a Java object (POJO) for easy manipulation of the code. We need to follow below steps:
- In this, we want to read the value we need to enter JSON String and enter the class name with .class extension whose value we want to read.
CreateEmployee2Pojo empobj=obj.readValue(empJson,CreateEmployee2Pojo.class);
2. Now we will get the values
					CreateEmployee2Pojo empobj=obj.readValue(empJson,CreateEmployee2Pojo.class);
System.out.println(empobj.getName());
System.out.println(empobj.getSalary());
System.out.println(empobj.getAge());
System.out.println(empobj.isMarried());
System.out.println(empobj.getEmpAddress());
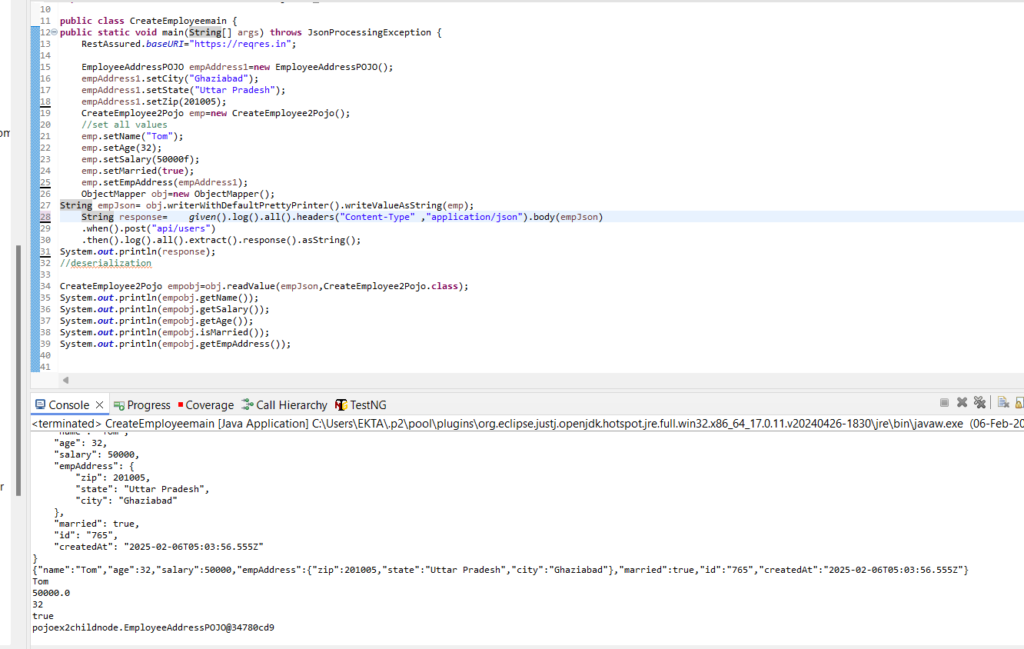
Code Snippet:
					public class CreateEmployeemain {
public static void main(String[] args) throws JsonProcessingException {
	RestAssured.baseURI="https://reqres.in";

	EmployeeAddressPOJO empAddress1=new EmployeeAddressPOJO();
	empAddress1.setCity("Ghaziabad");
	empAddress1.setState("Uttar Pradesh");
	empAddress1.setZip(201005);

	CreateEmployee2Pojo emp=new CreateEmployee2Pojo();
	//set all values
	emp.setName("Tom");
	emp.setAge(32);
	emp.setSalary(50000f);
	emp.setMarried(true);
	emp.setEmpAddress(empAddress1);

	ObjectMapper obj=new ObjectMapper();
String empJson=	obj.writerWithDefaultPrettyPrinter().writeValueAsString(emp);

String response=	given().log().all().headers("Content-Type" ,"application/json").body(empJson)
	.when().post("api/users")
	.then().log().all().extract().response().asString();
System.out.println(response);
//deserialization
CreateEmployee2Pojo empobj=obj.readValue(empJson,CreateEmployee2Pojo.class);
System.out.println(empobj.getName());
System.out.println(empobj.getSalary());
System.out.println(empobj.getAge());
System.out.println(empobj.isMarried());
System.out.println(empobj.getEmpAddress());


Output :
Tom
50000.0
32
true
pojoex2childnode.EmployeeAddressPOJO@34780cd9
Screenshot:
Create POJO for different employees and add them using List
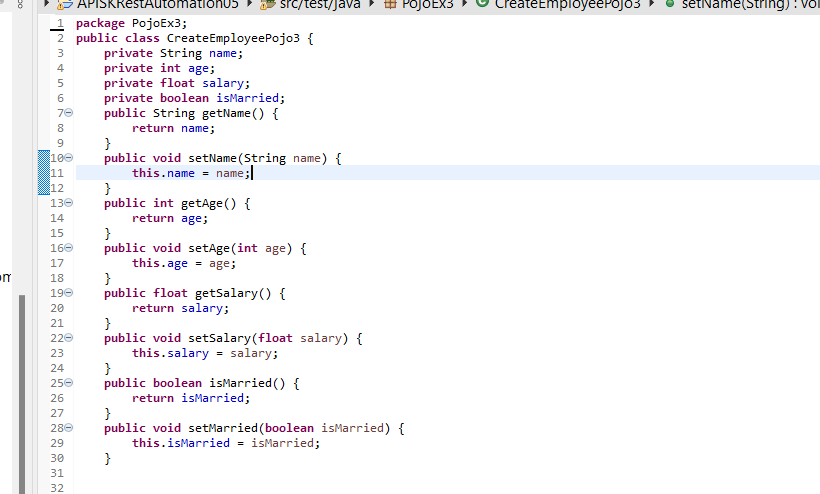
We will create two classes in one package first class name CreateEmployeePojo3, the second class name CreateEmployee3.
Code Snippet:
					public class CreateEmployeePojo3 {
	private String name;
	private int age;
	private float salary;
	private boolean isMarried;
	public String getName() {
		return name;
	}
	public void setName(String name) {
		this.name = name;
	}
	public int getAge() {
		return age;
	}
	public void setAge(int age) {
		this.age = age;
	}
	public float getSalary() {
		return salary;
	}
	public void setSalary(float salary) {
		this.salary = salary;
	}
	public boolean isMarried() {
		return isMarried;
	}
	public void setMarried(boolean isMarried) {
		this.isMarried = isMarried;
	}
Screenshot:
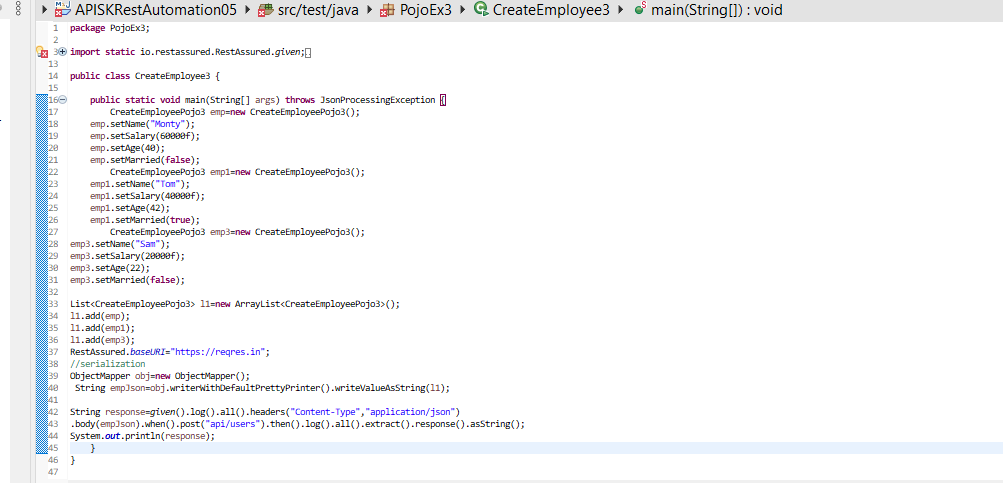
2.CreateEmployee3
We will create an object of CreateEmployeePojo3 and set values for three employees.
Code Snippet:
					CreateEmployeePojo3 emp=new CreateEmployeePojo3();
	emp.setName("Monty");
	emp.setSalary(60000f);
	emp.setAge(40);
	emp.setMarried(false);
		CreateEmployeePojo3 emp1=new CreateEmployeePojo3();
	emp1.setName("Tom");
	emp1.setSalary(40000f);
	emp1.setAge(42);
	emp1.setMarried(true);
		CreateEmployeePojo3 emp3=new CreateEmployeePojo3();
emp3.setName("Sam");
emp3.setSalary(20000f);
emp3.setAge(22);
emp3.setMarried(false);
3. Add all the employees details using List
We will use the add() method and add all the elements of the employees.
Code Snippet:
					List<CreateEmployeePojo3> l1=new ArrayList<CreateEmployeePojo3>();
l1.add(emp);
l1.add(emp1);
l1.add(emp3);
We will pass the List in the body.
We have to serialize the value for that we need to create a JSON String with the help of the class ObjectMapper. We have now created a JSON String we pass ‘empJson’ in the body
Code Snippet:
					RestAssured.baseURI="https://reqres.in";


ObjectMapper obj=new ObjectMapper();
String empJson=obj.writerWithDefaultPrettyPrinter().writeValueAsString(l1);
String response=given().log().all().headers("Content-Type","application/json")
.body(empJson).when().post("api/users").then().log().all().extract().response().asString();
System.out.println(response);
Screenshot:
Screenshot Output:

Create POJO for Complex JSON Array with nested JSON String
POJO class will only be created for JSON String and not for JSON Array. We will create three POJO`s class and one main class.
					{
   "name": "Tom",
   "age": 42,
   "salary": 50000,
   "empAddress": {
       "housedetails": {
           "flatNo": 101,
           "street": "PR",
           "landmark": [
               "DP Library",
               "DP hotel",
               "JK Mall"
           ],
           "appartmentName": "gsk"
       },
       "zip": 703001,
       "state": "WB",
       "city": "kolkatta"
   },
   "banks": [
       "ICICI",
       "SBI"
   ],
   "married": false,
   "id": "195",
   "createdAt": "2025-02-10T09:08:00.410Z"
}
1.HouseDetails5POJO(Grand Child)
We have flatNo, Street, AppartmentName, and Landmark which is an array. We will create private members and generate getter and setter methods. We will create private members using List<String> Landmark for landmarks.
Code Snippet:
					public class HouseDetails5POJO {
private int flatNo;
private String Street;
private String AppartmentName;
private List<String> Landmark;
public int getFlatNo() {
	return flatNo;
}
public void setFlatNo(int flatNo) {
	this.flatNo = flatNo;
}
public String getStreet() {
	return Street;
}
public void setStreet(String street) {
	Street = street;
}
public String getAppartmentName() {
	return AppartmentName;
}
public void setAppartmentName(String appartmentName) {
	AppartmentName = appartmentName;
}
public List<String> getLandmark() {
	return Landmark;
}
public void setLandmark(List<String> landmark) {
	Landmark = landmark;
}
Screenshot:

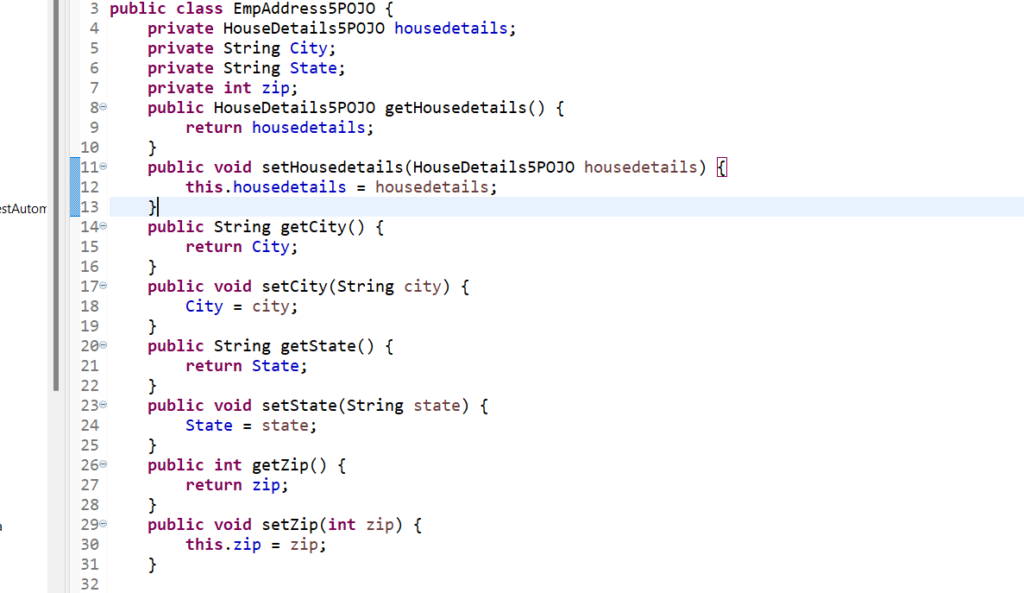
2.EmpAddress5POJO(Child)
We will create private member of HouseDetails5POJO as datatype and variable as housedetails, Zip, State, City. and then we will generate getter and setter methods.
Code Snippet:
					public class EmpAddress5POJO {
	private HouseDetails5POJO housedetails;
	private String City;
	private String State;
	private int zip;
	public HouseDetails5POJO getHousedetails() {
		return housedetails;
	}
	public void setHousedetails(HouseDetails5POJO housedetails) {
		this.housedetails = housedetails;
	}
	public String getCity() {
		return City;
	}
	public void setCity(String city) {
		City = city;
	}
	public String getState() {
		return State;
	}
	public void setState(String state) {
		State = state;
	}
	public int getZip() {
		return zip;
	}
	public void setZip(int zip) {
		this.zip = zip;
	}
Screenshot:
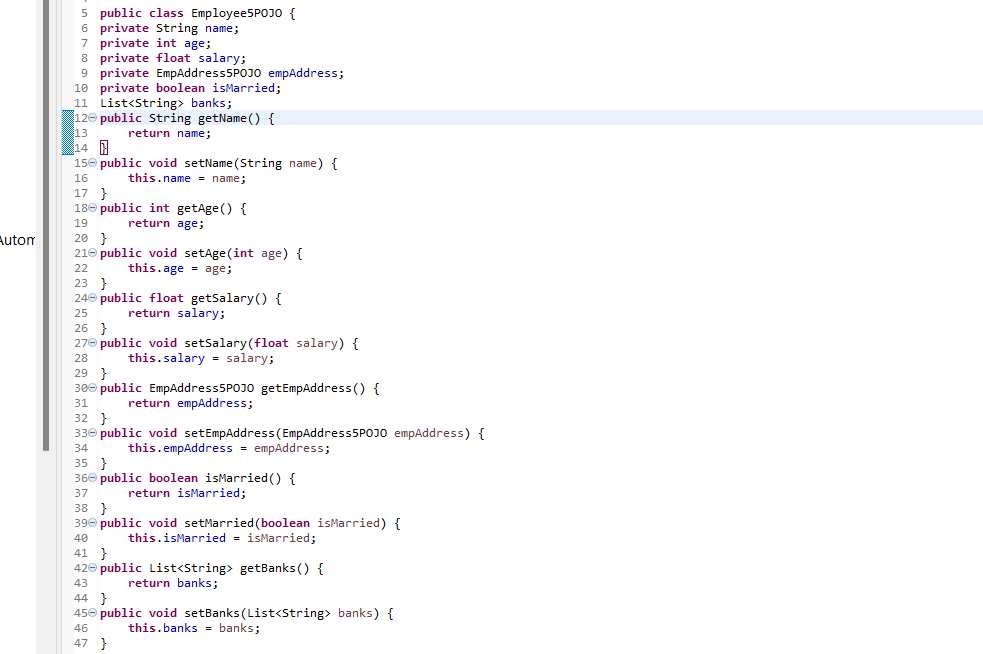
3.Employee5POJO(Parent)
We have name, age, salary, isMarried, and banks which is an array. We will create private members and generate getter and setter methods. For bank, we will create private members using List<String> bank. We will create a private member of EmpAddress5POJO as datatype and variable as empAddress.
Code Snippet:
					public class Employee5POJO {
private String name;
private int age;
private float salary;
private EmpAddress5POJO empAddress;
private boolean isMarried;
List<String> banks;
public String getName() {
	return name;
}
public void setName(String name) {
	this.name = name;
}
public int getAge() {
	return age;
}
public void setAge(int age) {
	this.age = age;
}
public float getSalary() {
	return salary;
}
public void setSalary(float salary) {
	this.salary = salary;
}
public EmpAddress5POJO getEmpAddress() {
	return empAddress;
}
public void setEmpAddress(EmpAddress5POJO empAddress) {
	this.empAddress = empAddress;
}
public boolean isMarried() {
	return isMarried;
}
public void setMarried(boolean isMarried) {
	this.isMarried = isMarried;
}
public List<String> getBanks() {
	return banks;
}
public void setBanks(List<String> banks) {
	this.banks = banks;
}
Screenshot:
4.CreateEmployeeMain5(Main)
1) We will first create a List of String for landmark and then create an object of grand child POJO HouseDetails5POJO and set the values.
					a) List<String> landmark=new ArrayList<String>();
	landmark.add("DP Library");
	landmark.add("DP hotel");
	landmark.add("JK Mall");

b) HouseDetails5POJO hd=new HouseDetails5POJO();
	hd.setFlatNo(101);
	hd.setAppartmentName("gsk");
	hd.setStreet("PR");
	hd.setLandmark(landmark);
2) We create an object of child POJO EmpAddress5POJO
					EmpAddress5POJO emp=new EmpAddress5POJO();
	emp.setHousedetails(hd);
	emp.setCity("kolkatta");
	emp.setState("WB");
	emp.setZip(703001);
3) We will first create List of String for banks and then create an object of parent POJO Employee5POJO
					a) List<String> banks=new ArrayList<String>();
	banks.add("ICICI");
	banks.add("SBI");

b) Employee5POJO emp1=new Employee5POJO();
	emp1.setAge(42);
	emp1.setEmpAddress(emp);
	emp1.setMarried(false);
	emp1.setName("Tom");
	emp1.setSalary(50000f);
	emp1.setBanks(banks);
4) We have to serialize the value for that we need to create a JSON String with the help of the class ObjectMapper. We have now created a JSON String we pass ‘empJson’ in the body.
					ObjectMapper obj=new ObjectMapper();
String empJson=	obj.writerWithDefaultPrettyPrinter().writeValueAsString(emp1);
RestAssured.baseURI="https://reqres.in";
String response=given().log().all().headers("Content-Type" ,"application/json").body(empJson)
.when().post("api/users")
.then().log().all().extract().response().asString();
System.out.println(response);
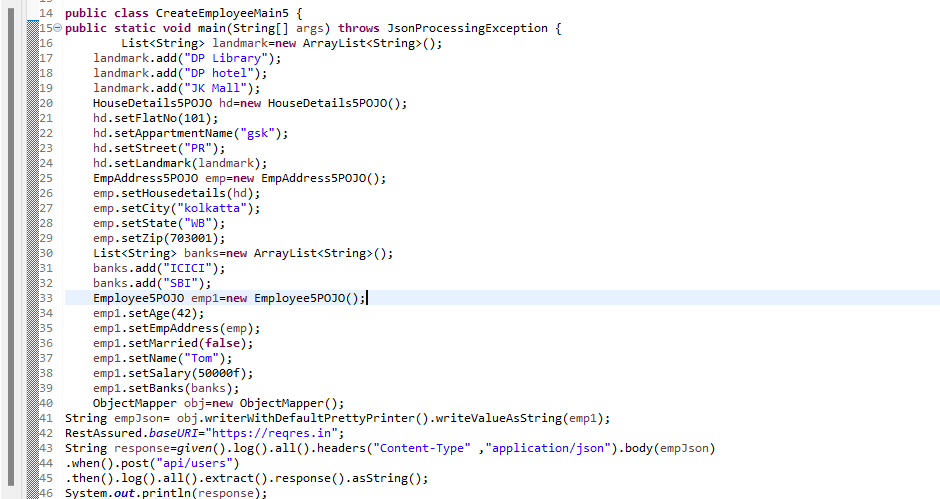
Code Snippet:
					public class CreateEmployeeMain5 {
public static void main(String[] args) throws JsonProcessingException {
		List<String> landmark=new ArrayList<String>();
	landmark.add("DP Library");
	landmark.add("DP hotel");
	landmark.add("JK Mall");
	HouseDetails5POJO hd=new HouseDetails5POJO();
	hd.setFlatNo(101);
	hd.setAppartmentName("gsk");
	hd.setStreet("PR");
	hd.setLandmark(landmark);
	EmpAddress5POJO emp=new EmpAddress5POJO();
	emp.setHousedetails(hd);
	emp.setCity("kolkatta");
	emp.setState("WB");
	emp.setZip(703001);
	List<String> banks=new ArrayList<String>();
	banks.add("ICICI");
	banks.add("SBI");
	Employee5POJO emp1=new Employee5POJO();
	emp1.setAge(42);
	emp1.setEmpAddress(emp);
	emp1.setMarried(false);
	emp1.setName("Tom");
	emp1.setSalary(50000f);
	emp1.setBanks(banks);
	ObjectMapper obj=new ObjectMapper();
String empJson=	obj.writerWithDefaultPrettyPrinter().writeValueAsString(emp1);
RestAssured.baseURI="https://reqres.in";
String response=given().log().all().headers("Content-Type" ,"application/json").body(empJson)
.when().post("api/users")
.then().log().all().extract().response().asString();
System.out.println(response);
Output:
{
   "name": "Tom",
   "age": 42,
   "salary": 50000,
   "empAddress": {
       "housedetails": {
           "flatNo": 101,
           "street": "PR",
           "landmark": [
               "DP Library",
               "DP hotel",
               "JK Mall"
           ],
           "appartmentName": "gsk"
       },
       "zip": 703001,
       "state": "WB",
       "city": "kolkatta"
   },
   "banks": [
       "ICICI",
       "SBI"
   ],
   "married": false,
   "id": "594",
   "createdAt": "2025-02-10T11:19:03.329Z"
}
Screenshot:
Screenshot Output:

Conclusion:
To sum up, there are several benefits to building and utilizing POJO (Plain Old Java Object) classes in RestAssured for API testing. It makes it easier to map Java objects to API answers, enabling testers to work with the data in a more organized and object-oriented manner. Tests are made easier to read and maintain by utilizing POJOs to organize and validate answer data. POJOs also aid in deserialization, which is crucial when working with intricate XML or JSON structures. By following this tutorial and gaining hands-on experience, you are equipping yourself with valuable knowledge that can propel your career in Software Testing Cucumber to new heights. Testers can increase the robustness of their test automation framework and expedite the test writing process by integrating POJOs with RestAssured’s comprehensive API testing features. In the end, POJOs facilitate more effective API test development and execution, improve code reusability, and lower the chance of errors.
Also Read:
Popular Courses


Upskill Yourself
Consult Us
Consult Us